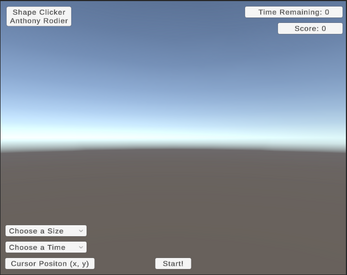
IT201_Project1_Anthony_Rodier
Feature 1: Display Cursor Position
Input: Cursor Location
Process: The mouse position on the screen is tracked using Input.mousePosition and stored in a two-dimensional vector. The vector's x and y coordinates are then formatted and assigned to the TextMeshProUGUI.This portion of the code is inside the update function, which allows the position to update in real-time.
Output: In the bottom left corner of the screen, you can see the coordinates are being updated.
Difference: Unlike the class project, this feature formats coordinate points differently. Due to the requirement to display the cursor position, the functionality cannot be altered.
Feature 2: Change Time Limit
Input: Selected time from the dropdown display
Process: The time limit is updated based on what the user selects from the dropdown.
Once the time limit is selected, the countdown and time remaining variables are updated accordingly. This ensures that the timer will start at the correct time when the user decides to start the game.
Output: Once the user starts the game, the timer will begin the countdown and display it in the top right corner
Difference: The class project does not have any feature resembling a timer.
Feature 3: Change Size
Input: Selected size from the dropdown display
Process: The size of the cube is updated based on what the user selects from the dropdown. Once the size is selected, the object’s scale is updated and will be reflected once the game begins.
Output: Once the user begins the game, the object will reflect the size selected in the dropdown.
Difference: The class project does have an option to change the size of the primitives in the UI; however, a slider is used to adjust the size, not a dropdown.
Feature 4: Start/Stop Timer
Input: Click on the button to start or stop the game
Process: The code first checks to see if the user has selected a time limit and size for the shape. If this condition is met, the countdown timer begins, and the cube will start appearing on the screen. If the user decides to click the button again, the game will be stopped, and the timer will be reset.
Output: The button will either be updated with “Start!” or “Stop” depending on the given state. Additionally, the timer will start updating and cubes will begin to spawn on the screen.
Difference: The class project does have a Start/Stop button
Feature 5: Destroy Cubes and Update Score
Input: Left-click on the cube
Process: If the user clicks in the UI, the program detects if the user clicked on the cube. If the ray cast does intersect with the cube, the score is updated, and the cube is destroyed and replaced immediately.
Output: The score is updated in the top right corner of the screen and another cube spawns if the timer has not reached zero.
Difference: In the class example, the user clicks on the screen to get the shapes to spawn, whereas, in my game, the cubes spawn after the start button is pressed and destroyed with a left click.
